These small motors are often used in gauges for cars and motorcycles. They offer very fine precision and smooth motion:
- 315° angle of rotation
- 3780 steps
- 1/12° rotation for each step.
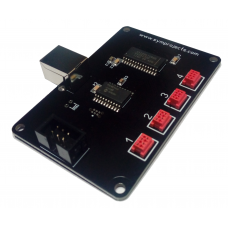
Compared to other simpler solutions based on Arduino boards, the X27 Controller mounts a AX1201728SG driver chip, specifically designed to control the small stepper motors of the X27 family. The main advantage of using this driver chip is that it uses micro stepping to provide smoother positioning: 12 steps per degree instead of just 3, if the driver chip is not used. This increases the possible positions of the motors from 945 to 3780, over the 315° angle of rotation.
The X27 is intended to be used to create your own gauges or dashboard. Or retrofit dashboards that cannot be controlled directly by the Pro-Gauge controller. Controlling full dashboard with the Pro-Gauge controller has always been difficult because the signals expected by the dashboards might not be compatible with those generated by the Pro-Gauge. Also the lack of documentation of the pin-out of the dashboard often makes the operation unsuccessful.
Instead, the X27.168 motors can be installed inside the gauge or dashboard, replacing the existing ones, and controlled by the X27 Controller board. At the moment the board can simulate these gauges:
- Rev counter
- Speedometer
- Fuel level and fuel pressure
- Water temperature
- Oil temperature and oil pressure
- Turbo pressure
- Brakes air pressure
- Adblue level
The data for these gauges must be included in the telemetry generated by the simulator. This page shows what data is available with each one of the supported titles.
The X27 Controller can drive up to four X27.168 motors. One is included with each boards. Multiple controllers can be connected. Each motor includes a 3D printed pointer that can be used for testing. But you can replace it with your own. The motor's connection cable is 20 cm long.
Configuration - Linear scale
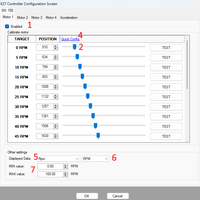
The picture above is the configuration section for each of the four motors connected to the X27 Controller.
The configuration process requires only few steps:
- First, the motor must be enabled, clicking the Enable checkbox marked with 1
- Use the dropdown lists 5 and 6 to select the data associated to the gauge and its unit.
- Set the values of the bottom and the top of the scale of the gauge (7).
- Next, adjust the FIRST slider, marked with 2, until the pointer of the gauge moves to the bottom of the gauge's scale
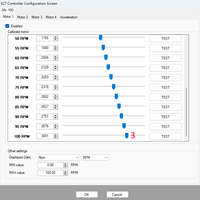
- Adjust the LAST slider, marked with 3, until the pointer of the gauge moves to the end of the scale.
- Scroll back up and click QUICK CONFIG (4). All the sliders between the first and the last will move to evenly distribute across the gauge's scale.
These simple steps must be repeated for each of the motors connected to the X27 Controller.
Please note that each time the X27 Controller's USB cable is connected, all four motors will rotate to the bottom of the scale, anti-clockwise, to calibrate themselves. This happens only when the USB cable is connected.
Configuration - Non linear scale
If the scale of the gauge is not linear, which means the values of the scale are not evenly distributed, follow the steps in the section above (Configuration - Linear scale) and then adjust the single sliders as necessary.
Maximum gauge acceleration
Probably you won't need to adjust this setting and will leave the maximum acceleration set to the maximum.
But isfthe pointer mounted on the motor is heavier than expected and the gauge is moving very fast, the motor might not be able to keep up with the fast movement required and stay behind, going out of sync.
If this happens, the maximum acceleration of the motor can reduced to position 2 or 1. This will make the motor less reactive but able to correctly move the pointer that is mounted on it.
Relay
The relay will switch ON and OFF when SimDash is started and stopped. The relay can be used to operated the gauge's backlight, so that it is switched ON and OFF automatically.
X27 Controller
- Product Code: X27 Controller
-
£29.50
Available Options
Related Products
Relay module for X27 Controller
The Relay Module for the X27 controller can be used to automatically switched on and off the backlig..
£5.00
X27.168 motor for X27 Controller
Additional X27.128 motor for the X27 Controller, with 20 cm long connection cable...
£6.50


